.png)

Cork contact adhesive Wakol D 3540 0,8kg
WakolD3540-0,8
- secure payment!
- cheap shipping!
- express delivery!
- cheap shipping!
- express delivery!
In stock
£ 71.26

The presented photos and visualizations show the appearance of the cork in studio lighting conditions. In reality, the colour may vary slightly depending on the light and screen settings.
Does it seem like updating your home always needs a massive budget and loads of professionals? Because of that, you keep delaying your revamp; before long, the months slip by and your home still feels dull — no energy, no fresh touch, no real character. But guess what? It doesn’t have to be that way. You can easily give your space a whole new vibe without splashing out or hiring anyone — all thanks to Honeycomb Cork 3D Panels. Made from a natural and safe material, they’re a breeze to put up and look absolutely unique. Best of all? You’ll love being able to say, “Yep, I did it myself.”

Striking Design

Safe to Use

Premium Quality

Eco-Friendly Impact

Long-Lasting Look

Super Easy to Clean
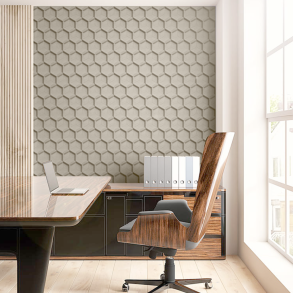
The Honeycomb design looks just like a beehive — it has a clean, geometric, 3D style. When all the panels are fitted together, the wall turns into a striking, modern honeycomb feature. The changing light and shadow really bring it to life, making it look lively and shifting as you move around or the lighting changes.
Cork, being a natural product, adjusts to its environment. That’s why it’s essential to leave it in the room where it will be installed for at least 72 hours before starting. This allows it to adapt to the temperature and humidity, stopping it from warping or peeling later.
Skipping this step might mean the panels won’t hold properly — they could start coming away or even fall off. Giving them time to adjust helps ensure they stay firmly in place and look great for longer.
Not really recommended. Cork panels stick best to flat, smooth and tidy walls. If the surface is uneven or wavy, the panels might stick out oddly, and the joins can become more obvious.
No, because the old wallpaper might come off along with your new panels. Plus, there could be lumps or dust hidden behind it that stop the glue from holding properly. It’s always best to strip the wallpaper off fully, clean the wall thoroughly, and get it ready before you start installing panels.
A single tile covers about 0.02 m². So to cover 1 m² of your wall, you’ll need around 50 tiles in total.
They’re usually a little noticeable. To keep them as discreet as possible, let the panels rest in the room where they’ll be mounted for at least 72 hours first. This way, the cork adapts to the room’s temperature and humidity, which helps stop any bigger gaps from appearing later.
Super easy — just wipe them with a soft cloth or a light duster. If you run into more stubborn dirt, you can carefully use a gentle cleaner that’s safe for cork surfaces.
Just remember: avoid strong chemicals like bleach, acetone or chlorine, as they can ruin the cork’s finish.
For sure! It has lots of advantages over standard materials. Wallpaper? Lovely to look at, but it rips and scratches too easily — not great for a hallway. Paint? Looks fresh at first, but soon picks up marks and scuffs. Ceramic tiles? Hard and cold, which can make the hallway feel a bit unfriendly.
Cork, however, feels soft and warm, lasts longer than paint, and holds up better to daily bumps than wallpaper. It also gives the hallway a cosy, natural look and helps improve the sound in the space too.
It’s not really recommended to use cork panels in spots that get lots of strong, direct sunlight. Like wood, cork is a natural product, and over time, heavy UV exposure can cause the colour to fade or change.
If you do want them in a bright space, think about putting up blinds or curtains to reduce sunlight, or pick walls that don’t face the sun directly all day long.
Want to make your interior feel cosier and more natural, but can’t face a big renovation? A coat of paint might seem like a quick fix, but it won’t last long. Wallpaper can look great at first, but it quickly collects marks and needs replacing sooner than you think. Decorative cork is a far more exciting choice: it brings warmth and a natural feel to your home, while also practical enough to handle daily life with ease.

The honeycomb-style design has a striking shape and a soft, matte look. It makes a statement when set against smooth, plain walls. It feels fresh and contemporary but never fake — it’s real cork after all.
Trends might come and go, but decorative cork is a timeless choice that always feels right. Stone and concrete can also seem “modern”, but they tend to feel cold and unwelcoming — the complete opposite of cork. Plastic panels quickly lose their colour, stop impressing, and aren’t kind to the environment. Cork, on the other hand, ages gracefully — its look only gets better and more interesting as time goes on.
Cork is a 100% natural material that doesn’t trap dust or dirt. It’s perfect for people with allergies and for anyone who wants to make their living space healthier. It even helps keep humidity at a comfortable level, making the atmosphere indoors much more pleasant.
The matte surface isn’t just good-looking; it’s also incredibly practical. Unlike shiny tiles, it doesn’t reflect glare, and you won’t constantly spot fingerprints or smears. Just imagine all the time and effort you’ll save on cleaning!
You can fit Honeycomb cork panels on your own, with no need to hire professionals. All you need is a roller, some strong adhesive, and a few basic tools you probably already have at home.
The result? The satisfaction of completing a project by yourself and a wall that’s both stylish and functional. Plus, the pleasure of proudly telling guests, “I did this myself!”
Honeycomb cork panels absorb sounds and help reduce echo in a room. The panels don’t just look like a honeycomb — cork’s unique structure actually works the same way, with countless tiny air pockets that dampen noise effectively.
Cork also works as an extra thermal layer. It helps retain heat during chilly months and stops walls from getting too hot in the summer.
Cork is harvested from the bark of cork oak trees, without harming or felling them. The bark grows back every 9–12 years, allowing the tree to keep thriving and supplying more sustainable cork.
Cork is totally biodegradable, so it doesn’t harm the planet like plastic does. Picking 3D cork might feel like a small step, but it truly makes a positive difference for the environment.
| Model | 3D Honeycomb |
| Format | Tile |
| Colour | Anthracite |
| Side length | 86 mm |
| Length | 174 mm |
| Width | 150 mm |
| Thickness | 6-35 mm (at the thickest point) |
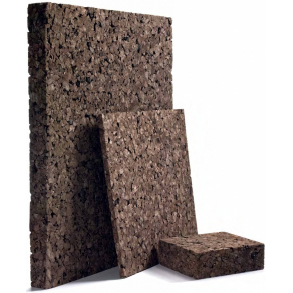
| Material | Natural cork |
| Coverage | 0.02 m² (one tile) |
| Number of tiles needed per 1 m² | Min. 50 tiles |
| Installation | Glue |
| Consumption of Wakol D-3540 Adhesive | 0.8 kg - around 170 tiles, 2.5 kg - around 600 tiles |
| Diagonal | 173 mm |
| Adhesive layer | No |
| Possibility of return | no return possible (custom made product) |
D3540-0,8
In stock
£ 71.26
D3540-2,5
In stock
£ 97.83
D3540-5,0
- secure payment!
- cheap shipping!
- express delivery!
In stock
£ 119.04
041004005
- secure payment!
- cheap shipping!
- express delivery!
In stock
£ 99.72

3083
- secure payment!
- cheap shipping!
- express delivery!
In stock
£ 65.94
Customers who bought this product also bought

KE-50WL1
- secure payment!
- cheap shipping!
- express delivery!
In stock
£ 122.46
KE-40WS1
- secure payment!
- cheap shipping!
- express delivery!
In stock
£ 110.62
PK3DHCWH
In stock
£ 22.23 for 3 pcs.
KE-50
In stock
£ 92.58
 Secure payments
 always free shipping
 Highest quality
 Satisfaction Guarantee